Hello Friend,Welcome to Our Blog. In This tutorial lets see how to turn on or off write
Protection for a device in Windows 10.
What is Write Protection???
Write Protection is an Setting Which Makes Our device Write Protected,Which Means data
Can Be only read from the device,but not drive,for example : If You Plugged in USB and if
you enabled Write Protection to that device,You Can Only Open the Files inside the
USB,but You cannot do Any Writings like even Creating a new folder is Impossible Until
turning off Writing Protection for that device.
How to turn on or Off ???
If You Wish to turn on or off Write Protection then Follow the Steps as it is in Your Windows
10 PC.
Step 1 : Login to your Windows 10 PC.
Step 2 : Press Windows + R Key.
Step 3 : Type gpedit.msc
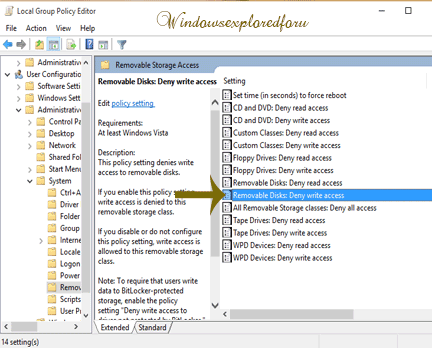
Step 4 : It Will Open a New Window Known as Local Policy Editor on that do as follows.
Step 5 : Click on User configuration
Step 6 : Click on Administrative templates
Step 7 : Click on System.
Step 8 : Click on Removal Storage Access folder
Step 9 : Click on "Removal Drives :Deny Right Access"
To Allow Write Access...
To Deny Write Access...
Protection for a device in Windows 10.
What is Write Protection???
Write Protection is an Setting Which Makes Our device Write Protected,Which Means data
Can Be only read from the device,but not drive,for example : If You Plugged in USB and if
you enabled Write Protection to that device,You Can Only Open the Files inside the
USB,but You cannot do Any Writings like even Creating a new folder is Impossible Until
turning off Writing Protection for that device.
How to turn on or Off ???
If You Wish to turn on or off Write Protection then Follow the Steps as it is in Your Windows
10 PC.
Step 1 : Login to your Windows 10 PC.
Step 2 : Press Windows + R Key.
Step 3 : Type gpedit.msc
Step 4 : It Will Open a New Window Known as Local Policy Editor on that do as follows.
Step 5 : Click on User configuration
Step 6 : Click on Administrative templates
Step 7 : Click on System.
Step 8 : Click on Removal Storage Access folder
Step 9 : Click on "Removal Drives :Deny Right Access"
To Allow Write Access...
- Click on Properties.
- Click on Disabled.
To Deny Write Access...
- Click on Properties.
- Click on Enabled.
Note: In Some Systems like Home editions Group Policy Edititor is disabled.But You can
Still Make this Changes for that,
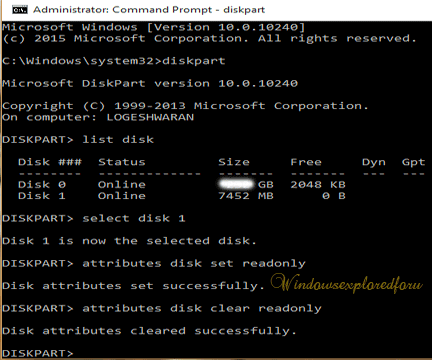
Step 1 : Open Command Prompt as Administrator
Step 2 : Type diskpart.
Step 3 : Type list disk
Step 4 : Type the disk You Need to include Write Protection.
Example : Select disk 1.
To Turn on Write Protection.
Type attributes disk set readonly
To Turn off Write Protection.
Type attributes disk clear readonly
That's it...

